connect-via-VNC: Difference between revisions
mNo edit summary |
mNo edit summary |
||
| Line 9: | Line 9: | ||
sudo systemctl status x11vnc | sudo systemctl status x11vnc | ||
You will see something like this: | You will see something like this: | ||
[[File:vnc status enabled.png]] | |||
If you don’t want to expose this interface to others, you can disable VNC server by running this command: | If you don’t want to expose this interface to others, you can disable VNC server by running this command: | ||
sudo systemctl stop x11vnc | sudo systemctl stop x11vnc | ||
Check VNC server status again and you will see: | Check VNC server status again and you will see: | ||
[[File:vnc status disabled.png]] | |||
However this status only last until next reboot. If you want to indefinitely disable VNC, you can use this command: | However this status only last until next reboot. If you want to indefinitely disable VNC, you can use this command: | ||
| Line 22: | Line 26: | ||
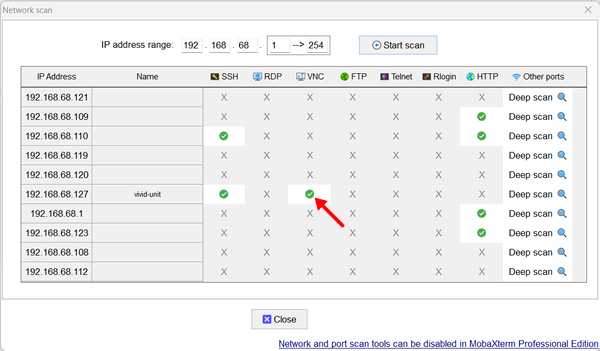
MobaXterm provides a tool named “Network scanner”, and it lists all devices in your network that support certain service: | MobaXterm provides a tool named “Network scanner”, and it lists all devices in your network that support certain service: | ||
[[File:mobaxterm network scan vnc.png]] | |||
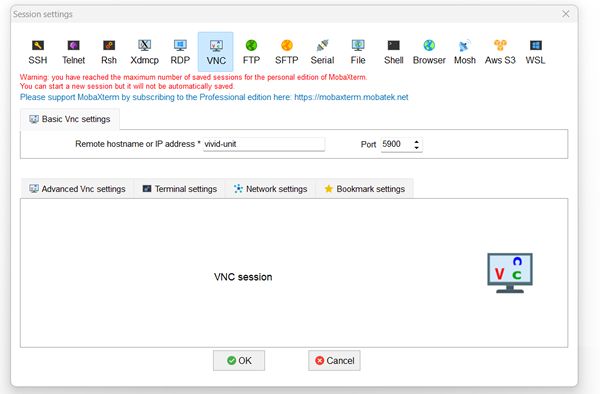
After the scan your Vivid Unit will be listed, and you can see it supports SSH and VNC. Just single click the button with small green tick sign, and it opens a window for VNC connection: | After the scan your Vivid Unit will be listed, and you can see it supports SSH and VNC. Just single click the button with small green tick sign, and it opens a window for VNC connection: | ||
[[File:mobaxterm vnc connection.png]] | |||
The remote hostname or IP address is automatically filled, so is the port, so you just need to click the “OK” button to initiate the connection. You may be requrested to fill in the password before openning the remote desktop. | The remote hostname or IP address is automatically filled, so is the port, so you just need to click the “OK” button to initiate the connection. You may be requrested to fill in the password before openning the remote desktop. | ||
Revision as of 16:06, 20 January 2024
Connect to Vivid Unit via VNC
Sometimes it will be more convient to control your Vivid Unit from another device (usually with bigger display, full sized keyboard and mouse etc.). If you just need a command line interface, you may connect to Vivid Unit via SSH. If you need desktop eniroment, then you can use VNC.
What is VNC?
VNC stands for virtual network computing, and it is a remote desktop sharing system for controling another computer remotely. VNC can display the remote computer’s desktop on your screen, and send your mouse and keyboard actions to the remote computer. This allows you to fully control the remote computer, just like using a local computer.
Enable/Disable VNC
By default Vivid Unit has x11vnc (VNC server) configured and enabled. You can run this command to check the VNC server status:
sudo systemctl status x11vnc
You will see something like this:
If you don’t want to expose this interface to others, you can disable VNC server by running this command:
sudo systemctl stop x11vnc
Check VNC server status again and you will see:
However this status only last until next reboot. If you want to indefinitely disable VNC, you can use this command:
sudo systemctl disable x11vnc
After running this command, VNC server will not start automatically after reboot.
Connect to Vivid Unit via VNC
If your PC installed Windows, then MobaXterm is a very good tool for VNC connection. It can also be used for SSH connection by the way.
MobaXterm provides a tool named “Network scanner”, and it lists all devices in your network that support certain service:
After the scan your Vivid Unit will be listed, and you can see it supports SSH and VNC. Just single click the button with small green tick sign, and it opens a window for VNC connection:
The remote hostname or IP address is automatically filled, so is the port, so you just need to click the “OK” button to initiate the connection. You may be requrested to fill in the password before openning the remote desktop.


